While experimenting with 2-color 2-strand textured knitting
where one color always shows on the purl side, the other on the knit side, and
then some stitches are converted so that a purl stitch pattern in the
contrasting color shows on the knit side, I got to thinking that it would be
neat to have not only contrasting purl but also knit stitches on the right side.
It seemed to me that if you crossed the strands as in intarsia knitting you
should be able to do that.
I did the flower in the picture below this way, crossing the
strands between needles, and putting a hairpin shaped into a hook over each
crossing to keep the strands in place. Since you not only have to hold the strands
where they come off the needles to guide the yarn but you also have to push
the carriage with the other hand, I had to think of some way to keep the pins
in position. So I shaped the ends of the hairpins into eyelets, ran a piece
of elastic cording through them and tied the cord to the clamps that the machine
is attached to the table with. That did keep the pins in place, but unfortunately
if you had several crossings in a row with a pin over each one, it created a
lot of tension and small stitches. Then I thought, hmm, if I put the pin only
over one strand at a time, maybe it would pull it down far enough so the other
strand would knit first?
So I tried that and found out that it does work and that the
pins do not even have to pull down the strands. In the first of the two samples
on the left, the strands were"tripped'n flipped"
numerous times on the same row which resulted in a contrasting knit stitch
pattern on the front. I guess you could call this "just
about true floatless fairisle!" It also does not create as much
tension as crossing the yarns so you can do it much more often on the same row.
While there is a right side and a wrong side to this knitting,
with the pattern reversed on the other side, there are no floats which is great
because little fingers can so easily get caught in them. Since, in addition,
knit stitches show detail a little better than purl stitches, this might be
a nice way to make a baby blanket with letters or other motifs that don't show
up so well in purl stitches - I had experimented with lettering done in purl
stitches and was not too happy with the results. It seems that straight up and
down, single columns of purl stitches almost completely disappear into the fabric
on the right side and alphabets are a mixture of straight and diagonal lines.
Although,.... wait a minute......I just had a thought......hmmmm, I wonder if
a garter stitch alphabet would work better??......oh no!!... I feel another
sample coming on! :)
Anyway, here's how:
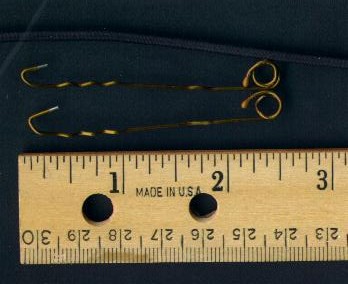
To do this, you'll need a piece of elastic cord and some
hairpins - the ones that are u-shaped (there were two types in the package -
some thinner, some heavier). I thought the heavier ones worked better because
they didn't get bent out of shape as easily (pun intended, hehe!). Or you could
use wire and cut it the right length then shape it the same way.
Anyway, I straightened out each hairpin, then using needle-nose
pliers shaped one end around a knitting needle to form a loop and bent the other
end into a hook. Ok, ok, I admit, it doesn't look too professional but the main
thing is that they are all the same length, from head to toe, so to speak! After
some experimenting, I also removed the plastic coating from the tip of the hooked
end by squeezing it with needle nose pliers. Made it much easier to unhook the
pins from the knitted stitches.
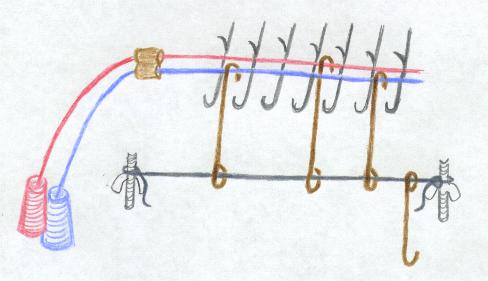
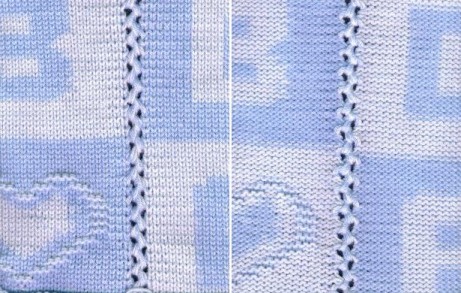
The elastic string is pulled through the loops and then tied
to the clamps right above the wingnuts that the Bond is attached to the table
with, see drawing below. The hooked part of the pins should be facing away from
the machine as they are hanging down from the elastic cord so they don't get
stuck in the fabric.
To Knit:
Before casting on and to keep them from plying together,
the two strands of yarn are fed through two short pieces of a straw which are
taped together with freezer tape. For this technique, you'll need the intarsia
keyplate in the carriage without the wire guide as it interferes with the pins.
Lay the strands of yarn across the open needles in the basic
color arrangement that you want. Hold the straw between your fingers right about
where the strands come off the needles as you hook the pins and also as you
knit across to control the flow of yarn and to assure the strands remain in
the same position. Always put the strand that you want to be the main color
on the front or the knitted side, furthest away from you across the needles,
the other one behind it. Then at the beginning of every row, between the
first and second needle, always hook a pin over the strand that you want to
be the main color on the right side.
In the drawing below, the red yarn is to be the main color
on the front or knitted side so for that color arrangement, the strands would
always be placed across the needles in that order and the first pin would always
be hooked over the red yarn between the first and second needle of each row.
Later, if you want to change so the blue yarn is the main color on the front,
flip the straw holding the yarns so the blue strand is now furthest away from
you, then always hook the first pin over the blue strand between the first and
second needle of each row.
How Does it Work?
The way this works, I guess, is that when you hook a pin
over one of the two strands in between two needles, the flow of that strand
is slowed down or interrupted and that causes the other strand to knit on the
purl side or on the side that is facing you. That color strand will now keep
knitting on the purl side until another pin is hooked on it further along the
row to make it switch places with the other color strand again. Unfortunately,
sniffle, it doesn't work for changing only one stitch and not always dependably
for two stitches, it works best for groups of three and more stitches. Single
stitches and groups of two I reknitted - actually repurled - manually, bringing
the other strand to the foreground. I put the transfer tool into the stitch
below the purl bump and pulled back the needle releasing the stitch and doubled
float onto the tool. I pushed the needle forward again, letting only the stitch
slide behind the latch and dropping the doubled float into the open needle hook.
Then depending on which strand I wanted to suppress, at either side of the needle,
I pushed down on the "unwanted" strand with the prong of my transfer
tool and pulled the needle back. This caused the other strand to go through
the stitch first, changing the color.
The pins should be hanging on the strands with just a little
tension to keep them in place but not so much as to pull them down, otherwise
you'll get very small stitches. You'll need to adjust the rubber string to get
the right tension. At first I thought the pins should be right between the two
needles where I wanted the color change to take place. I soon realized though
that the colors already change one stitch before the spot
where the pin is hooked. So when working from a pattern, I always hook a pin
between the space after the first needle that I want to knit in the other
color. Now I have to be honest, this is not rocket-science or one-hundred-percent
foolproof but it does work most of the time. As you knit across the row - slowly
- you'll see the strands switching right before the spot where a pin is hooked
over a strand.
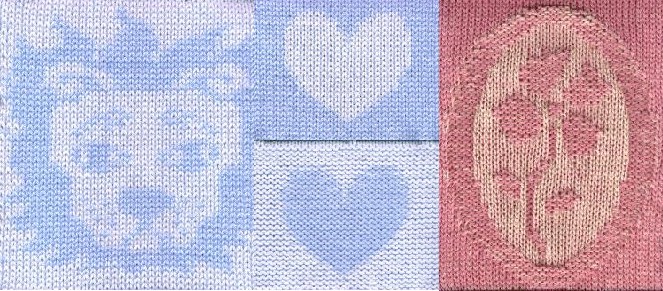
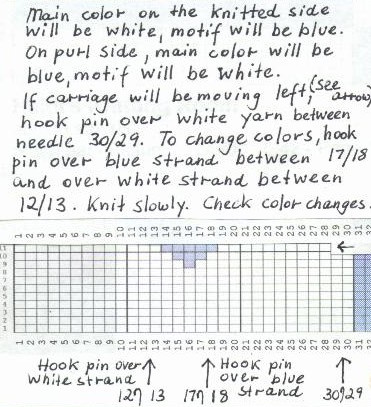
How to Position Pins:
The basic arrangement of strands across the needles for the
sample chart below is white strand furthest away from you, blue strand next
to it on each and every row. (The knitted heart sample at the top of the page
was knitted in the reverse colors.)The chart shows the colors as they will be
on the right or knitted side. They will be reversed on the purl side so that
the main color on the side that is facing you will be blue, the heart motif
will be white. To start each row, hook a pin over the white strand, between
the first and second needle regardless of the direction in which the carriage
is moving. This will cause the blue yarn to be the main color on the purl side.
In order to change the color from blue to white for the heart motif, hook a
pin on the blue strand after the first needle that you want to be in the white
color, in this case between needles 17/18 (the first white stitch should be
on needle 18 after the row is knitted) and then to change colors back from white
to blue, hang a pin over the white yarn between needles 12/13 (the first blue
stitch should be on needle 13 after the row is knitted). Keep in mind that the
color scheme that will be facing you on the purl side is exactly the reverse
of what is shown on the chart.
To keep track of the stitches more easily, I always put a strip
with the stitch numbers right on top of the row that I am working on. To hang
the pins and always proceeding in the direction in which the carriage will be
moving, I say to myself "18 blue" which tells me to hook the pin right
after needle 18 on the blue strand of yarn, then "13 white"
which tells me to hook the pin right after needle 13 on the white strand.
(The pins will always alternate between the two colors, if the last one
was hooked on a white strand, the next one will be hooked on a blue strand,
without exception, you just have to make sure that they are hooked between the
right two needles.)
If the carriage was going to be moving to the right instead
of to the left, the pins would be placed to the right after the first
stitch that was to be in the other color. For this same row, the first pin would
still be hooked after the first needle and on the white strand, then the next
pin would be hooked on the blue strand between needle 14/15 so that 14 would
be the first white stitch, then on the white strand between needles 19/20 so
that 19 would again be a blue stitch.
To knit the lion at the top of the page, there were numerous
color changes and quite a few pins. Also single stitches had to be repurled
manually. It is definitely faster to knit simple motifs with broad outlines
than motifs with detailed features.
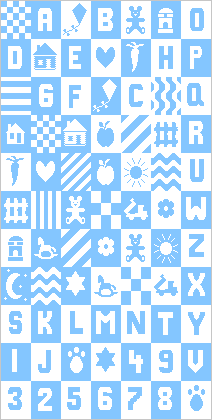
Below are some motifs and an alphabet I charted in Designaknit
that I think might work nicely for a "quilt-look"baby afghan.
They would be knitted in panels of 30 stitches with the colors of background
and motifs alternating every 38 rows to make them look like square blocks. You
could leave the second and the second to the last needle at each end out of
work (just add two needles to the panel on each side of the 30 stitches, then
leave needles 2 and 33 out of work), and at the end latch the panels together,
so that a white square would be next to a blue square, etc. Or you could join
the panels with a crochet hook using this slip
stitch technique and two strands of yarn in either one or the other color
or both. I used two strands of Bernat Baby Softee yarn for the sample below
but any yarn that can be knitted with two strands will work. The fuzzier yarn
strands seem to cover each other better than, for instance, smooth cotton strands
do. You could use different colored yarns as well, maybe knitting each block
in another 2-color combination and really mixing it up! Of course, then you
would have to work in the extra ends. To get started, try just one easy motif,
such as the heart and see what you think! Let me know if you have any questions,
I must have knitted another 20 feet of samples in this technique.