The way double knitting in two colors
works is really simple, it does take some time though, so you might not want
to make anything very large!Ā If you have knitted with two colors on the Bond
and have relatched stitches for ribbing, you should have no problems.ĀThis pattern
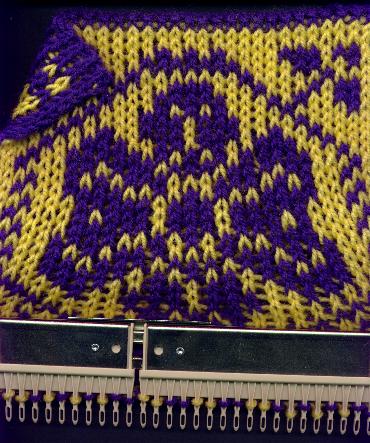
has 58 stitches and 33 rows and it doesn't matter whether it's upside down or
not.Ā It is very practical to have a large chart, about the size of the actual
needles on the bed.
I know it looks terrible, but trust me,
it does come out right!
Start with a closed cast-on and knit
the first row in your main color.Ā Put the pattern chart behind the needle butts
on your bed and push all the needles that will be knitted in the contrasting
color to holding position.Ā You can follow the squares on the pattern with your
finger and push the needles forward with the other hand, or whatever works best
for you.Ā
Knit the first row.Ā Push all the needles
that were in holding position back to forward working position with the latches
open.Ā If you have a second carriage with the intarsia keyplate, lay your yarn
in the hooks and knit the contrast stitches (take off the wire guide).Ā If you
have only one carriage you would have to pull the needles that were just knitted
to holding position, then put the carriage back on the other side of the bed,
thread it with the contrast yarn and knit across.Ā
Now you will need to convert every second
stitch across the bed to a knit stitch.Ā Put your latch hook tool under the
purl bump and float of stitch two, then release that stitch from the needle.Ā
Pull down on the stitch and latch it back up (make sure you remember what color
it was :) and that you are latching it up in front of the float!), then hang
it back on the needle so the float is now behind it.Ā The next stitch also has
a float in front of it but that's ok, it won't show later.Ā Continue to convert
every other stitch so you actually seem to be ending up with a 1x1 rib pattern.Ā
When you begin a new row, always pick
up the main color from under the contrast color so your sides will be connected,
the yarns need to cross there.Ā Pull up the slack on the edges of your knitting,
otherwise those last couple of stitches tend to get very large.Ā When you first
start knitting, it is pretty messy looking but once you get some rows done,
you can pull down on your stitches and you will see that they will close up
and even more so once you remove the weighted hem.Ā
You are really knitting two pieces at
the same time on every other needle, the only reason that they are connected
is that the colors are going back and forth from the front piece to the back
piece.Ā The way I knitted my sample was to cut each pattern row off the chart
after I was finished with it so I could always put the next row of the chart
right behind the needle butts.Ā It seems a bit wasteful but it was faster!Ā
Besides this chart, you can use any two
color fair-isle chart that you have, let's say you had one that was 11 stitches
across and had 13 rows like the picture below.Ā You could chart it first in
the original color combination, then chart it a second time with the colors
reversed.Ā You could cut and paste the entire first stitch column of your original
chart into a new chart.Ā Cut and paste the first stitch column of your reversed
chart right next to it. Continue with the next stitch column of each of the
two charts, etc. You will end up with twice as many stitches but the same number
of rows.
Let me know if you have trouble understanding
these directions, I'll try and do better! :)Ā